Pages

July 7, 2011

DIY Painted & Stained Concrete Living Room Floors


***This has been my most popular post, with many comments and questions.  I try to respond to everyone but many times I can’t because the email address for the commenter is listed as “noreply-comment@blogger.com”.  Here is a tutorial from another blogger that will show you how to fix this problem so I can respond to your comments:  Cinsarah's Tutorial.  

I mentioned in my last post that my mother in law is coming to town this month and we are trying to complete 1 zillion projects before she arrives.

Our carpet was absolutely horrible, disgusting, gross, vial, and any other gross words you can think of due to the addition of 2 wiener dogs to our family.  The carpet HAD.TO.GO! 

Rip Out Carpet

We don’t have the funds at this time to install hardwood floors so after pondering our DIY options we settled on staining the concrete slab. 

****NOTE****  We broke every rule there is regarding prepping and staining concrete floors.  Normally I would not do this but a friend of mine took the same steps in her kitchen (a few years ago) and to this day her floors are holding up perfectly!

Step One:  Rip Out Carpet

DIY Stained Concrete Floors Living Room

After the carpet was removed we realized our floors were in really bad shape.  The concrete has chips, cracks, mastic overflowing from the kitchen tiles, different textures and varying colors.  You can see the variation of concrete in this picture:

DIY Stained Concrete Floors Living Room

Step Two:  Remove Tack Strips

These things are pure evil.  I used a flat head screwdriver, hammer and a LOT of elbow grease to get these up.

DIY Stained Concrete Floors Living Room

Step Three:  Repair Floors

After removing all carpet and tack strips we were supposed to fill in any holes/cracks.  Since this is a “temporary” fix we skipped this step.  The cracks and rivets will add character!

Step Four:  Clean Floors

They say you are supposed to remove all grease and grime with a special cleaner but since my friend skipped this step and her floors are still great we skipped this step also.  Instead we swept, vacuumed and mopped the floors with a damp mop.  We saved money and time!

Step Five:  Tape Baseboards/Walls

You need to be very careful with the stain because it is very watery and splatters quite easily.

Step Six:  Paint Floors

The workers at Lowe’s and Home Depot will tell you that you cannot paint the floors with a solid color and then put the semi transparent concrete on top of the paint.  They are wrong!  We used Valspar exterior satin latex paint color matched to Mega Greige by Sherwin Williams.  This was paint we had left over from previous projects.  Painting the floors served two purposes: (1) it provided us with one uniform color to work with and (2) adds depth to the floors when the semi transparent stain is applied. 

This is our hall after we painted the floors. 

DIY Stained Concrete Floors Living Room

Step Seven:  Apply Semi

Transparent Stain

This process took a lot of trial and error.  We are working in sections so we painted a small area to test different methods of applying the stain.  We originally bought Quickrete semi transparent stain from Lowe’s but felt the stain wasn’t transparent enough so we switched to Behr’s semi transparent stain in the color Lodus. 

We first tried spraying the stain on the floor with a spray bottle then used a Wal-Mart bag and/or rag to dab the stain around.  It was very hard to get a somewhat consistent pattern and realized how much time it would take to achieve the look we wanted so we kept trying different methods looking for the easiest and fastest way to apply the stain.

DIY Stained Concrete Floors Living Room

We found the easiest and fastest way that achieved a great look was to roll the stain on top of the painted floors with 3/8” white woven fabric interior wall rollers.  This allowed us to layer the stain in light layers to add color, depth and dimension.  I used a paint brush to get the sides where the roller could not reach.  It is best to roll as delicately as possible in varying directions to prevent noticeable “roller marks”.

DIY Stained Concrete Floors Living Room

The semi transparent concrete stain dries EXTREMELY FAST so you have to work fast to prevent noticeable “seams”.  If you do get seams in the stain then you can keep going over the different sections layering color to make it look more natural. 

Step Eight:  Apply High Gloss

Sealer or Polyurethane


***UPDATE***:  (5/3/2012):  Please note with this step I am now suggesting to only use Polyurethane.  I used a high gloss sealer by Quickrete, that was fast drying, after a year we have random chips appearing everywhere.  My friend who has done this to her kitchen (a few years before I did) used polyurethane and has never had a chip in her floors.  The poly does take longer to dry but in the long run it is worth using it!

We used Quikrete’s Wet Look High Gloss Sealer from Lowe’s.  With 4 kids and 2 dogs running around we don’t have time to wait on polyurethane to dry so we went with the concrete sealer to finish the floors.  To apply the sealer we rolled it on the floors with the same type of roller we used to apply the stain.  This product also dries very fast so we were able to apply 1 layer, let it dry to touch and apply a 2nd layer in about an hour.


 DIY Stained Concrete Floors Living Room


DIY Stained Concrete Floors Living Room 

DIY Stained Concrete Floors Living Room

DIY Stained Concrete Floors Living Room 

Has anyone else attempted a project like this? 

I would love to hear your experiences!

I link to these awesome blogs: Making Monday Marvelous at C.R.A.F.T., Just Something I Whipped Up at The Girl Creative, Made By You Monday at Skip to My Lou, Show Me What Ya Got at Not JUST a Housewife, Get Your Craft On at Today’s Creative Blog, Show and Tell at Blue Cricket Design, Whatever Goes Wednesday by Someday Crafts, Hookin’ Up with HOH at House of Hepworths, {LTC} Link Party at Lemon Tree Creations, Strut Your Stuff at Somewhat Simple, Flaunt it Friday at Chic on a Shoestring Decorating, Free For All at Young and Crafty, Frugalicious Friday by Finding Fabulous, I’m Lovin’ It at Tidy Mom, It’s a Hodgepodge Friday by It’s a Hodgepodge Life, Remodelaholic’s Anonymous at Remodelaholic, Weekend Wrap Up Party at Tatertots & Jello, Show and Tell Saturday at Be Different Act Normal, DIY Project Parade at The DIY Showoff, Sunday Scoop at I Heart Naptime, Catch as Catch Can at My Repurposed Life

June 22, 2011

Grandma is coming to town...

My mother in law is coming to town in less then a month!  She lives in New York which means we typically only see her once a year.  We are all very excited to see her, but this means I must start {ahem finish} a ton of projects so my house is visitor ready.  

Right now our living room and hallway is a concrete slab.  I plan on painting / staining the floors before she arrives. 

Concrete floor to be stained

I have these two wieners to thank for ruining my carpet.

Wiener Dogs

My pantry has been looking a hot mess ever since the hinge broke and the door fell off.  Every time I am at Lowe’s I forget to look for the hinges.

Broke pantry hinge

We installed an above ground pool so our backyard is a disaster while we edge the pool with rock and build a deck.  My husband {on the right} and his brother seem to have a problem getting much accomplished when it is 100 degrees and the pool keeps calling their name.  We’ve got the posts installed, now we’ve just got to finish the deck.

Deck Around Above Ground Pool

Last fall I painted my living room Mega Greige by Sherwin Williams.  I am not loving the color and want to repaint my walls to a truer gray color.  This picture looks very gray but most of the day my walls look beige. 

Sherwin Williams Mega Greige

For now this is plenty.  If time permits I am sure I can come up with some other things to do before she gets here. 

I’m off to paint now...I think I have found a color I can live with for a few months!

June 3, 2011

I’m Passing Notes...

Meg at O Is Me started a fun link party that involves passing handwritten notes.  Meg loves the art and etiquette of handwritten letters and notes and she feels sad that it is becoming a rarity.  I am by no means the most etiquette person around, but I have always been a stickler for handwritten notes/letters so I share her sentiments. 

Passing Notes at O. is Me!

Passing Notes 06_03_11

P.S.  Thank you Meg for creating this link party.  While writing this letter I realized how dependent I am on my computer.  I felt like I was in kindergarten learning to write again.  Maybe next week, my letter will be neater. 

June 2, 2011

House Tour - Part I - Introduction & Exterior

My father in law owned our house and wanted to move into an apartment. In July, 2008 we took over his mortgage and moved into our first house that was not a rental. 

It is a ranch style house with 3 bedrooms and 2 bathrooms located on 1.5 acres.   

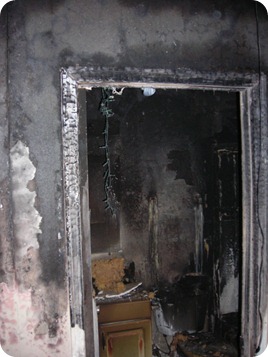
Around the time (August, 2007) my FIL started thinking of moving into an apartment his house caught fire.  The entire inside (with the exception of the laundry room) and roof had to be rebuilt. 

These are some pictures after the fire.

House Fire House Fire House Fire House Fire

Luckily they were not home when this occurred, he was insured and was able to rebuild.  This was exciting for us because he told us we could choose the colors for cabinets, carpets, etc. that were going to be used in the house.  We chose the carpet color then he changed his mind and decided to stay in the house.  He finished choosing the types of cabinets, counters, floors, etc. that would be used in the house.  A year later (July, 2008) he decided, for good, to move out and we moved in.  Although the inside was completely new the finishes were/are not my style. 

My “fear” of decision making and decorating has led to many attempts, without much success, to make our house a home we love.  IT IS A CONSTANT WORK IN PROGRSS and although we know we will eventually move I still have dreams of loving the house I am currently in.   

EXTERIOR

This is the way our house looked when we moved in 2008.

Dislikes:  Color of everything.  I don’t like the brick color, roof shingle color, shutter color, porch color.

 Ranch Style Home 

Last year I made some changes to the flower beds, painted the front porch and removed the shutters.  I was amazed at how much the brick color seemed to change by making these changes.  This picture may have been taken with just primer on the porch because it is actually a gray color whereas it looks white in this photo.

Ranch Style Home

This is the back of our house in 2008.  We are about to do a lot of work in the back so I will update the back exterior picture when that is complete.

Ranch Style Home


FRONT EXTERIOR TO DO LIST: 

  • Choose colors to decorate with that will pop and minimize the orange color in the bricks and shingles. 
  • Install new shutters.
  • Paint the front door.
  • Decorate the front porch so it is inviting and actually has some style. 
  • Figure out why my grass isn’t as green as it used to be.
  • Fix/Redo flower beds. 

BACK EXTERIOR TO DO LIST:

  • Tear down deck and fill in with concrete to make one big slab.
  • Paint entire concrete slab to have one consistent color.
  • Install above ground pool.
  • Build deck around pool.
  • Decorate entire back area for entertaining and relaxing.
  • Power wash house.
  • Figure out a way to disguise the AC unit and power/electrical boxes.
  • Paint back door.

Summer is here so we will be focusing on our backyard paradise we hope to create.  I will update all changes! 

Do you have as many projects on your to do list as I do? 

Be looking for Part II of my house tour which will detail our living room. 

May 19, 2011

Weight Loss - Slow and Steady

Weight Loss Progression Picture

Last September I mentioned I was feeling very BLAH.  I was unhappy with the weight I had gained after getting married in 2009 and wanted to get in shape.  Around March of 2010 I started whining and crying about my weight because I started outgrowing my clothes. 

I whined.  I cried.  I whined.  I cried.  Promised myself I would change. 

I whined.  I cried.  I whined.  I cried.  Promised myself I would change.

If only it were so easy to take that first step.  Fears of failing caused me to procrastinate.  Within a blink of an eye, I was outgrowing the larger sized clothes recently bought due to weight gain.  I finally woke up and realized I couldn’t wish this issue away, I had to do something about this issue. 

Last November I decided to join the January session of a boot camp program.  During the holidays, I allowed myself to eat as much hash brown casserole as I wanted and I did not hate myself for doing so. 

I enjoyed every bite!

Once January rolled around I was tired of eating and ready to get fit.  I started attending boot camp classes 4 days a week and started eating healthy.  The first 4 weeks I lost almost 11 inches all over my body.

I am proud to say I am still enrolled and attending the classes.  There are many reasons I have been successful this time around.  Being that this is a group setting, I have made friends that I look forward to seeing every day.  There is always someone there to encourage me to keep going when I think I can’t go  anymore.  Our teacher is awesome.  Class is not a competition, it doesn’t matter if we finish first or last, as long as we finish.

I am now fitting into clothes that I had not been able to wear and it feels wonderful.  I have learned so much in these last few months, that will help me live a better life.  My instructor tells us that this class should not be looked upon as a way to lose weight, rather it is to get us healthy.  Guess what one of the side effects of living a healthy lifestyle is??  YOU LOOK BETTER!!  I have also learned not to worry about the number on the scale.  I bet you won’t believe me if I tell you I have only lost about 10 pounds since I started.  I have lost more inches then pounds.

Here are some pictures taken during class (I am in purple)

I can’t tell you how many bad words I have said when we have to run zig zags up and down this hill that extends all the way to the road

Boot Camp Class

I love the burn from lunges!

Boot Camp Class

I’m not sure I will ever love running.

Boot Camp Class 


And here is the side view of my progress.

Weight Loss Progression Picture

If you are trying to find motivation to get fit reach deep down inside and find it because I know it is there!  Once you do you will feel AWESOME!

I link to these awesome blogs: Making Monday Marvelous at C.R.A.F.T., Just Something I Whipped Up at The Girl Creative, Made By You Monday at Skip to My Lou, Show Me What Ya Got at Not JUST a Housewife, Get Your Craft On at Today’s Creative Blog, Show and Tell at Blue Cricket Design, Whatever Goes Wednesday by Someday Crafts, Hookin’ Up with HOH at House of Hepworths, {LTC} Link Party at Lemon Tree Creations, Strut Your Stuff at Somewhat Simple, Flaunt it Friday at Chic on a Shoestring Decorating, Free For All at Young and Crafty, Frugalicious Friday by Finding Fabulous, I’m Lovin’ It at Tidy Mom, It’s a Hodgepodge Friday by It’s a Hodgepodge Life, Remodelaholic’s Anonymous at Remodelaholic, Weekend Wrap Up Party at Tatertots & Jello, Show and Tell Saturday at Be Different Act Normal, DIY Project Parade at The DIY Showoff, Sunday Scoop at I Heart Naptime

Related Posts Plugin for WordPress, Blogger...